Friday, February 26, 2016

Guilt (and GRAIN) Free Pizza!

Friday's. What is it about Pizza Friday's being THE way to start the weekend?  The pizza cravings usually start to roll in around noonish. Then I usually get an email from Pizza Hut an hour or so later, just taunting me with those delectable (and free) crust flavors...how do they know?! And to make matters worse, Friday nights have turned into my movie nights with Damon. Seriously though, what goes better together than a movie and pizza?! Throw a snugly and adorable toddler in there and I mean come on, who can resist.

Today, when the pizza cravings hit, I decided that I wanted to make my own pizza! Again. Do you know what I hated about my previous cauliflower crusts? I've had the obvious - way too soggy and crumbly which falls apart when you try to pick it up. I've had the way too thick crust that only bakes halfway through and sticks to the bottom anyway. Also, I don't play around when it comes to size on pizza night. We need pizza to feed an army basically.... so here's what I did tonight, it was pretty darn successful! Forget everything you know about parchment paper and give it a shot! Let me know if you enjoy it =)

Guilt and Grain Free Cauliflower Crust


Ingredients

1- 2 lb bag cauliflower florets
1/2 tsp sea salt
1 tsp dried basil
1 tsp dried oregano
1 tsp garlic powder
1/4 cup grated parmesan cheese
1/4 cup shredded mozzarella
2 eggs
about a 1/4 cup almond meal

Directions


1. Preheat oven to 450

2. I used almost a full bag of these cauliflower florets (I have probably about a cup leftover). Cut any long stems off and put the florets in the food processor. Chop in the processor for about 30 seconds, until you don't see any big pieces left and you're left with a fine rice texture. I did this in two batches and ended up with about 7 cups of "cauliflower rice"


3. Combine all the cauliflower rice in a microwavable bowl, cover but keep it vented so the steam doesn't stay in, and microwave for 4 minutes. 

4. Now the REAL FUN begins. I never said this was an easy process...yummy and worth it though!  Dump the cauliflower onto a clean kitchen towel. Let it cool for a few minutes before you wrap it all up and wring the heck out of it to get all that extra moisture out. This step really contributes to getting a crust that's chewy and not just crumby and moist. I probably got over a cup of water out of my towel! Put that muscle into it! 


5. Back into the bowl goes the rice. Now add your seasonings, eggs, cheese and the secret weapon - almond meal! I used about 1/4 cup.


6. All recipes I have read say to preheat pans and use parchment paper. Forget it all. A baking pan sprayed with olive oil spray is what I used. Form your cauliflower mixture into a dough ball with your hands. Plop it down onto your pre-sprayed baking sheet and flatten into a crust. Mine fit the whole pan perfectly! 


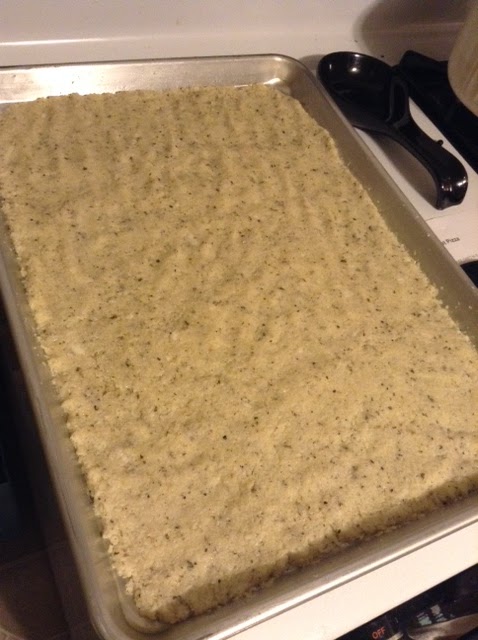
7. The baking time for your crust will depend on your oven. It's important to watch for color rather than go by time. Watch for that nice golden brown crust color that you know and love so much. Mine took about 20 minutes at 450 degrees. 

8. Remove crust from oven when it's nice and golden brown. Top with an organic, no sugar added pizza sauce and have your favorite little one sprinkle on the cheese. Top with parsley sprinkles and pop it back into the oven. Bake until bubbly - about 5 minutes!


 This crust cuts very easily. I used a regular old pizza cutter but didn't press very hard so I didn't damage my pan. Using a large spatula, the pieces came up SO easily and didn't fall apart! They were delicious and I didn't feel an ounce of guilt from eating 6 slices  =)


Monday, February 8, 2016

Better-For-You Baked Taquitos!


Seriously though, who doesn't LOVE Mexican food?! If your kiddos love tacos as much as my lil guy does, I bet this will be an awesome way to sneak some veggie power into their dinner...AND keep the taste factor up high! These "oven fried" taquitos are super yummy but half the calories of the deep fried taquitos you can sometimes get at a restaurant. And um, excuse me but....do they serve zucchini in their taquitos?!

You would never guess there is actual squash in this dish. There's nothing but flavor! Damon never once mentioned "spicy" while he chowed down, but if your kiddos are a little sensitive to spicy, try some greek yogurt to tone it down some. It's a great alternative to sour cream!

One final note, if you don't want to use this "oven-fried" method, you could totally just use this meat mixture in any taco related dish you have in your arsenal. Just think of the squashy possibilities! Wheat tortillas rolled up or chips crunched on top of a taco salad, nachos, quesadillas, lettuce wraps...all with this yummy meat and zucchini mixture. I'll be honest here, I picked up all the drippings with my fingers and ate it..... I mean, who wants to waste food, right? ;)


"Oven Fried" Chicken Taquitos 

Makes 4 Servings

Ingredients

1 medium zucchini
2 tsp extra virgin olive oil
1 lb raw lean ground chicken
3 Tbsp chili powder
2 tsp onion powder
1 tsp ground cumin
1/2 tsp sea salt
12 6-inch corn tortillas
Olive oil cooking spray
3/4 cup shredded cheddar (why not use 2%, right?)


Directions


1. Preheat Oven - 425 degrees

2.  Shred your zucchini with the large holes in a metal cheese grater (box grater?). Put in all in a clean, dry dish towel and squeeze out as much moisture as you can. Unwrap it, layer it and pat the rest dry.


3. Heat the evoo in a large skillet. Dump in your zucchini, ground chicken and seasonings. Mix it all up and make it happy! Cook, stirring frequently, for 5 - 7 minutes, until the chicken is done.


(Happy Meat)

4. Spread out the tortillas on a baking sheet, overlapping. Heat them in the oven for 2 minutes. Transfer them to a plate and cover to keep warm. 

5. Coat the baking sheet with cooking spray. 

6. In increments, roll your taquitos up. Use about 1/4 cup of happy meat per tortilla, placed on bottom 3rd of the tortilla, sprinkle with cheese and roll it up into a tight cigar shape - though not too tight because the tortillas might break, but a lot will break in the oven anyway. It all goes to the same place is my motto :)


7. Place the seam side down on the baking sheet. Once all your taquitos are rolled up and on the pan, give them all a quick coating with the cooking spray. This will get them nice and crispy in the oven! Bake them for 15 - 17 minutes, or until they're browned and crispy.

Don't worry if you don't get pretty taquitos, you won't be worried about how they look when you taste them! Make a quick dipping sauce with greek yogurt and your favorite salsa. Damon loved this part. He even dipped his broccoli in it, lil weirdo ;) 

 And the pay off! The best part of my day is when he actually eats his dinner and likes it.

If you try it and you love it, let me know! And please SHARE the squash love with your veggie-challenged-toddler-mom friends!